Stock
Stock and inventory
Manage stock and inventory in AutoM8 - track items and levels, move stock between locations including van stock, and run stocktakes.
Walkthrough Stock and inventory3 screenshots
- Everything you hold, in one list
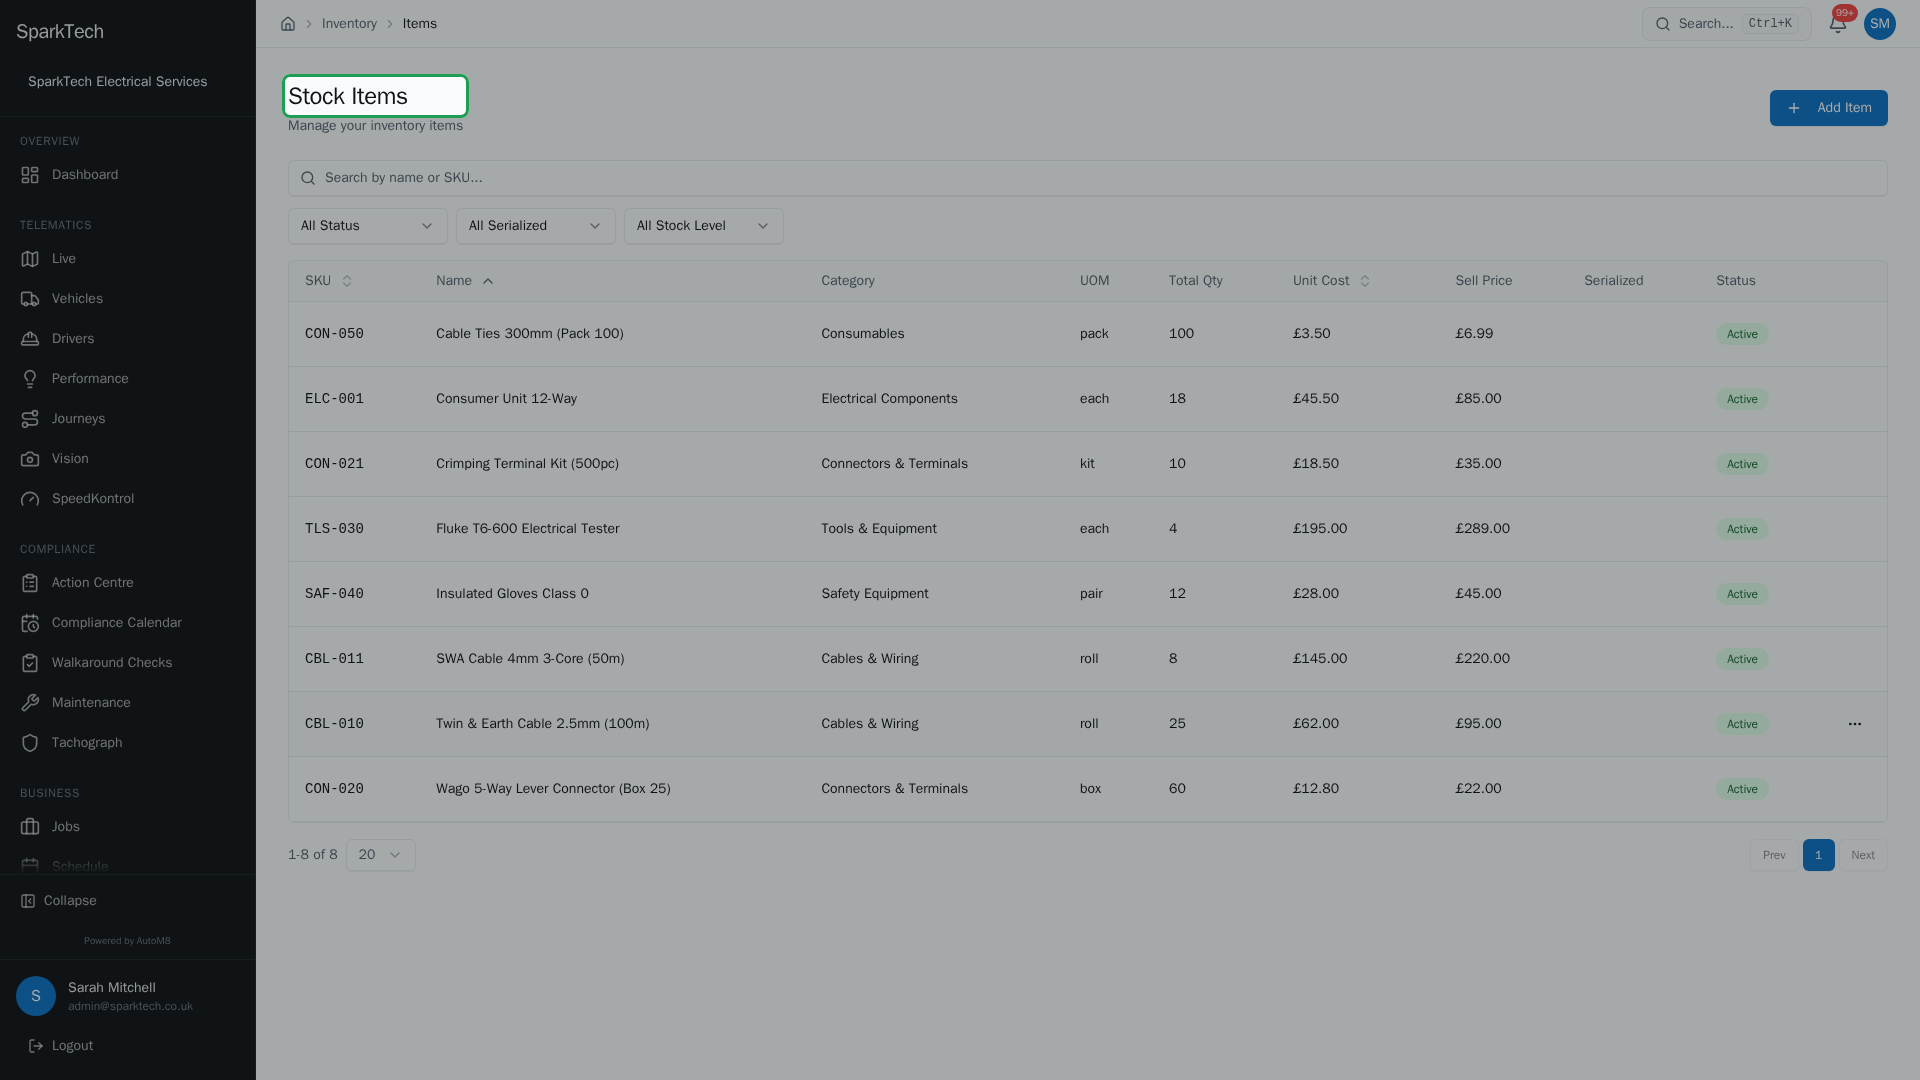
Open Business then Stock to see your items. Each row shows the SKU, name and total quantity, with a colour warning when a line is running low.
- The full picture for one item
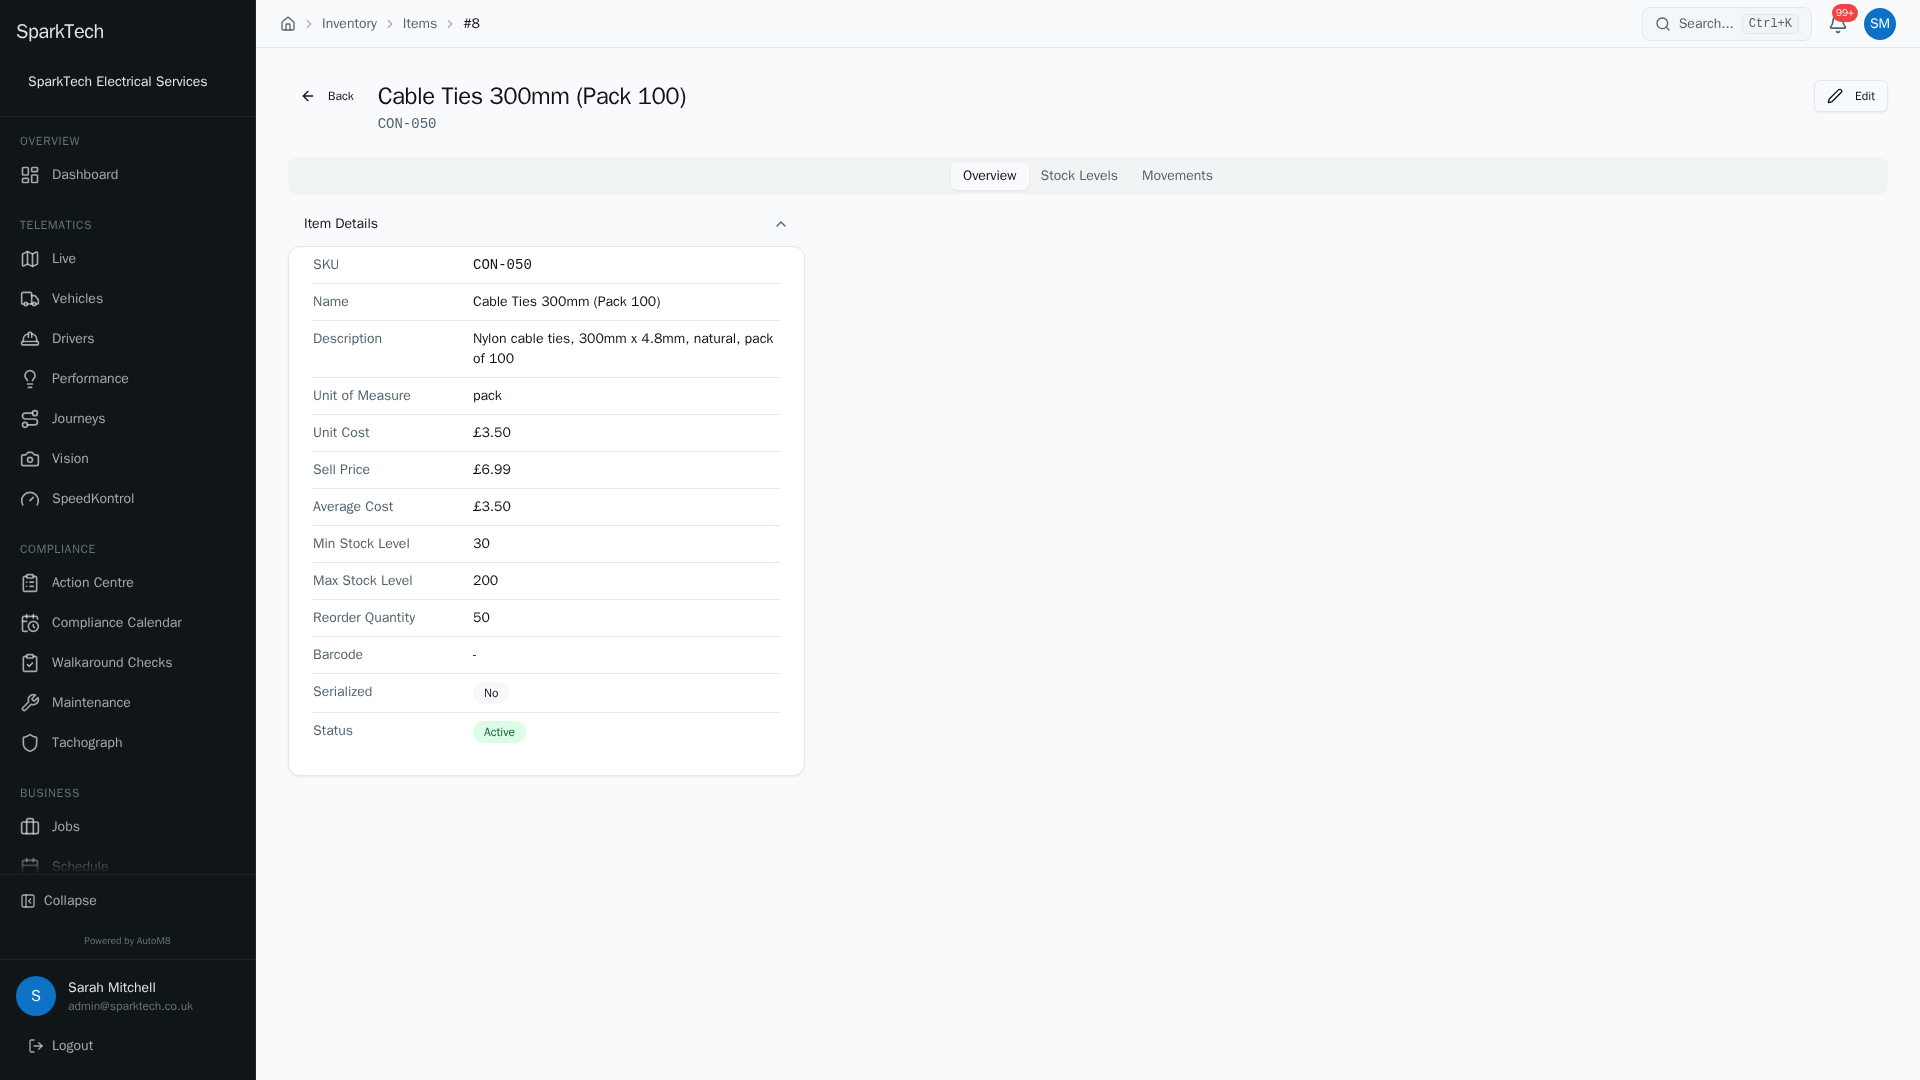
Open an item to see its cost and sell price, its stock level at each location including van stock, and its movement history.
- A full history of every change
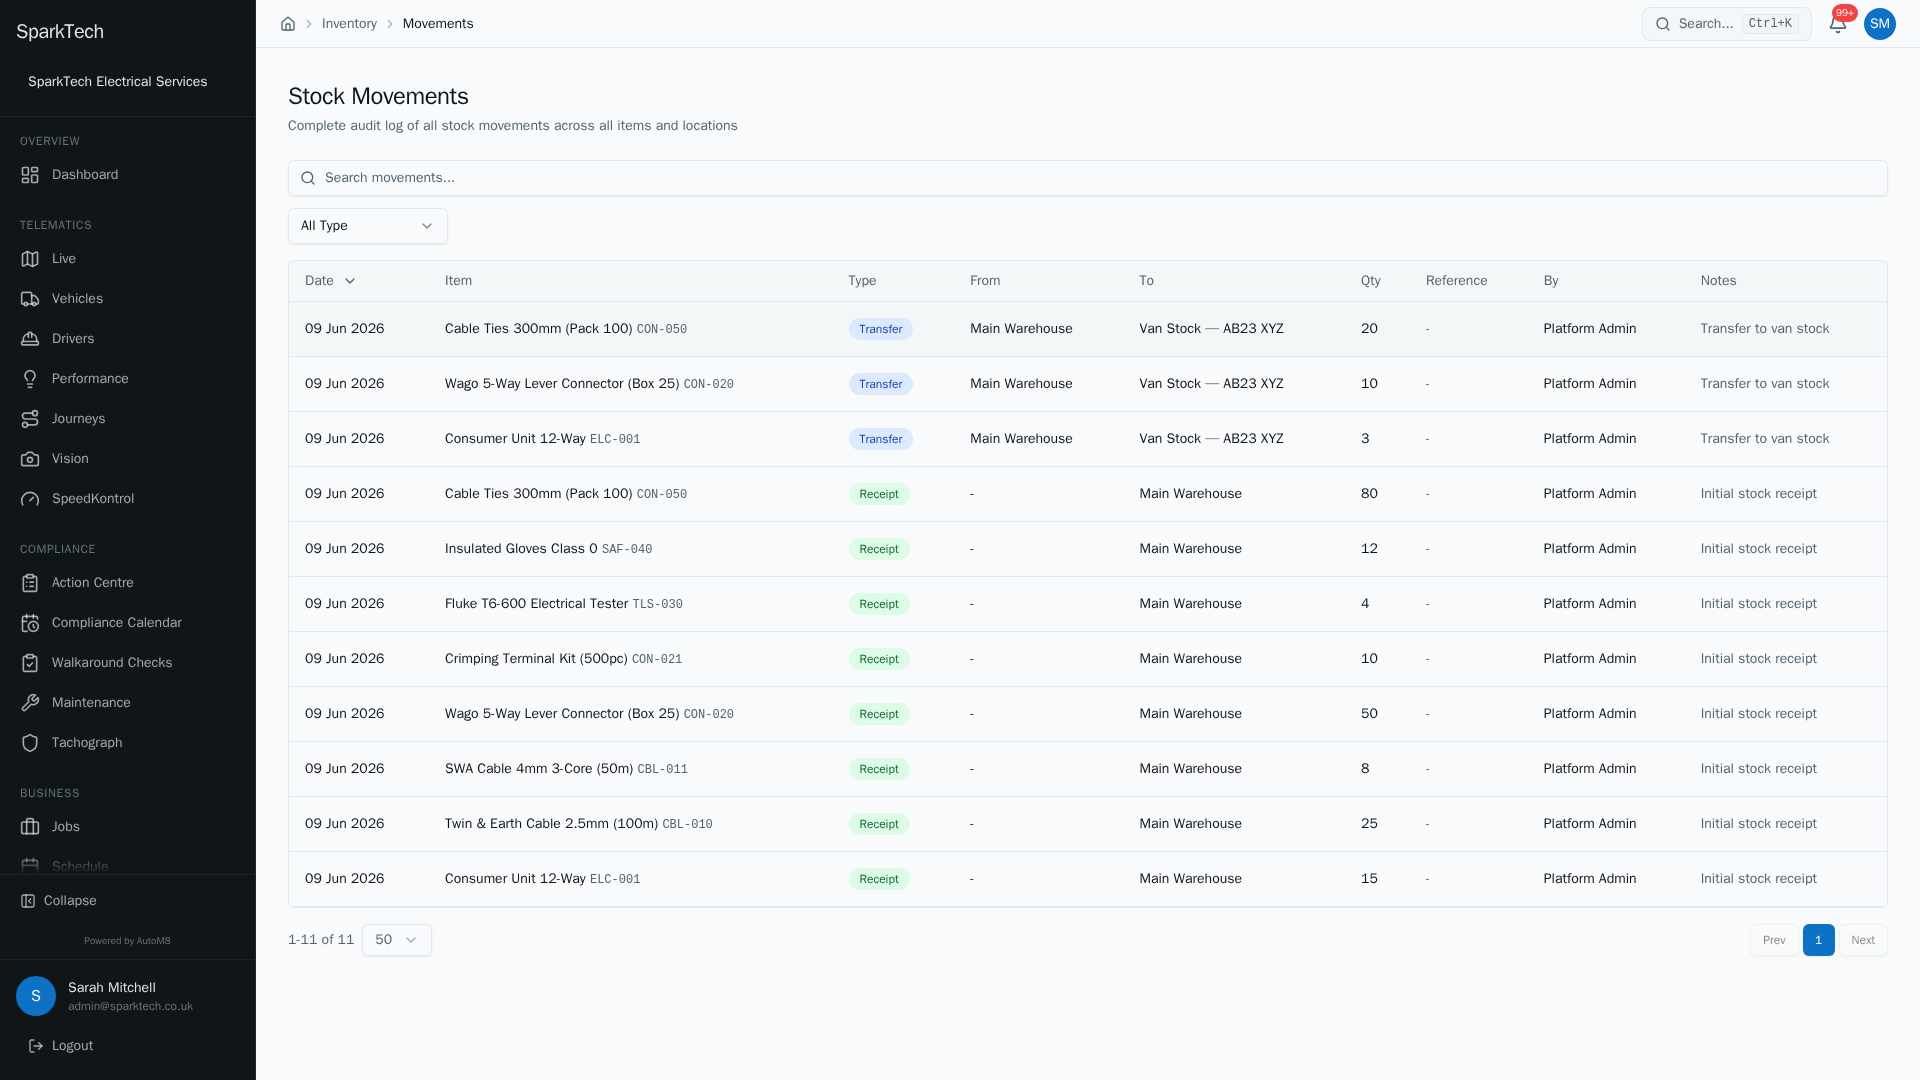
Every receipt, issue, transfer and adjustment is recorded under Movements, so you always know what moved, when, and who did it.
AutoM8 tracks your stock - what you hold, where it is, and what has moved - including van stock. Every change to stock (receiving a delivery, using items on a job, moving stock between a van and a warehouse) is recorded as a movement, giving you a full history.
Permissions. Stock actions live in the Stock / Inventory group in Settings > Roles and Permissions: View to see items and history, Create / Edit / Delete to manage items, Move to record movements and dispatch or receive transfers, Take to run stocktakes, Request to raise a transfer, and Approve to approve or reject one. Administrator and Manager include them by default. Some buttons in the app appear for any viewer but the server still checks the permission when you press them - each task below names the one that matters.
You reach it at Business > Stock, which opens the Items list (part of the Inventory area). From there the left-hand menu has Items, Movements, Requests and Stock takes.
Stock items
Who can do this: View to see the list; Create to add an item.
Under Inventory > Items, choose Add Item to add something you hold. The Add Item button only shows if you have Create. Each item has:
| Field | What it is |
|---|---|
| SKU | Your stock code for the item. Required. |
| Name | What the item is called. Required. |
| Unit of Measure | How you count it - each, kg, m, and so on. Required; defaults to “each”. |
| Category | Groups items together (see below). |
| Unit Cost | What it costs you. Required. |
| Sell Price | What you charge for it. |
| Min Stock Level | The level at which AutoM8 flags the item as low. |
| Reorder Quantity | How many to order when you restock. |
| Serialized item | Turn on for items tracked by individual serial number. |
| Active | On by default. Turn off to retire an item without deleting it. |
| Opening Quantity and Opening Location | Set both to seed stock on hand when you create the item, so it does not start at zero and instantly flag as low. |
Low-stock indicators
The Total Qty column warns you before you run out. It shows a red figure with a warning triangle when stock is below the item’s minimum, and an amber figure with a circle when it is getting close (below one-and-a-half times the minimum). A healthy level shows in plain text.
Finding items
Search by name or SKU, and filter the list by Status (Active / Inactive), Serialized (Serialized / Non-serialized) and Stock Level (Low Stock Only).
The item detail page
Who can do this: View to open it; the actions on each tab need their own permission (below).
Select an item (row action View Details, or click the row) to open its detail page. The heading shows the item name and SKU. If you have Edit, an Edit button lets you change the item’s fields inline and Save or Cancel. The page has these tabs.
Overview
The Item Details panel lists the item’s fields: SKU, Name, Description, Unit of Measure, Unit Cost, Sell Price, Average Cost, Min Stock Level, Max Stock Level, Reorder Quantity, Barcode, whether it is Serialized, and its Status (Active / Inactive). Average Cost is worked out by AutoM8 from your receipts and is read-only - you cannot edit it. Barcode and Max Stock Level are editable when you press Edit.
If the item has a QR code, a QR Code panel appears alongside, showing the code image, the SKU, and the barcode if one is set. You can print or scan it to find the item quickly.
Stock Levels
Shows on-hand stock per location - a table of Location, Type, On Hand, Reserved and Available, with the total across all locations at the foot. “Reserved” is stock committed to an open transfer request; “Available” is what is free to use. From here (or the Movements tab) you can Record Movement if you have Move - see below.
Movements
The recent movement history for this one item: date, type, from and to location, quantity, who did it, and any notes. For the full log across every item, use Inventory > Movements.
Serial Numbers
Only appears for serialized items. It lists each unit’s Serial Number, Status (available, issued, returned or written-off), its current location and when it last changed. See “Serial-number tracking” below.
Recording a movement
Who can do this: Move in the Stock / Inventory group. The server enforces this even though the button only shows on the Stock Levels and Movements tabs.
On an item’s Stock Levels or Movements tab, choose Record Movement, pick a Movement Type, and fill in the fields it asks for. There are six types:
| Type | Use it for | Locations asked for |
|---|---|---|
| Receipt | Stock coming in (a delivery). | To location, and optional unit cost |
| Issue | Stock going out (used on a job or sold). | From location |
| Transfer | Moving stock between two locations. | From and To location |
| Adjustment | Correcting a count by hand. | From location |
| Return | Stock coming back from a job or customer. | From location |
| Write-off | Damaged or lost stock. | From location |
For serialized items you can list the individual serial numbers being moved (comma-separated). Add optional notes, then choose Record Movement. The level at each location updates straight away and the movement is added to the history.
Receipts let you enter the unit cost for that delivery, which feeds the item’s rolling Average Cost.
Serial-number tracking
Who can do this: Create to add a serial number; View to see the list.
Turn on Serialized item when you create an item to track each unit individually. Serialized items show a Serial Numbers tab on their detail page. Choose Add Serial, type the serial number and Add. Each serial carries a status that moves with it:
| Status | Meaning |
|---|---|
| available | In stock and free to use. |
| issued | Given out to a job or customer. |
| returned | Come back into stock. |
| written-off | Damaged, lost or scrapped. |
Categories
Categories are how you organise your items - by type, supplier or wherever else makes sense. You can filter the items list and report on stock by category.
Locations and levels
Stock is held across locations, which can be a warehouse, a van or a site - a van is simply a stock location, so you always know what is on each vehicle. An item’s Stock Levels tab shows its on-hand, reserved and available quantity at each location.
Movements log
Who can do this: View to see the log.
Every receipt, issue, transfer, adjustment, return and write-off is recorded, giving you a full audit trail under Inventory > Movements. Each row shows the date, item, type, from and to location, quantity, who performed it and any notes. Search the log, and filter it by Type (Receipt, Issue, Transfer, Adjustment, Return, Write-Off).
The Reference column links a movement back to whatever created it - for example a purchase order or a stocktake - so you can trace where a change came from. Movements raised by hand have no reference.
Stock requests (transfers)
Move stock between locations with a request that goes through an approval workflow, under Inventory > Requests. Each request records the item, from and to location, quantity, who raised it and who approved it, and carries a status: pending, approved, dispatched, received or rejected.
Raising a request
Who can do this: Request in the Stock / Inventory group (enforced by the server).
Choose New Request, search for and select the item, pick the From and To locations (they must be different - locations need to be set up in your stock locations first), enter the quantity, add optional notes and Submit Request. It starts as pending.
Approving or rejecting
Who can do this: Approve in the Stock / Inventory group.
On a pending request the Approve and Reject buttons show only if you have Approve. Approving moves it to approved. Rejecting (you confirm first) moves it to rejected; the requester then raises a new one if they still need the stock.
Dispatching
Who can do this: Move in the Stock / Inventory group.
On an approved request the Dispatch button shows if you have Move. Dispatching transfers the stock out of the source location and moves the request to dispatched.
Receiving
Who can do this: Move in the Stock / Inventory group. The Receive button appears for any viewer, but the server checks this permission when you press it.
On a dispatched request, Receive confirms the stock has arrived and moves it into the destination location. The request then shows as received.
Stocktakes
A stocktake is a physical count of your stock that you reconcile against AutoM8’s records. Run one to check what you actually hold against what AutoM8 thinks you hold, under Inventory > Stock takes. The list shows each take’s date, location, type, status and who started and completed it. Open one from its row.
Starting a stocktake
Who can do this: Take in the Stock / Inventory group (enforced by the server).
Choose New Stock Take, pick the Location, and choose a Count Type:
- Full Count - counts all items at that location.
- Spot Check - counts only the items you add.
Choose Start Stock Take. It opens the counting screen with the status in progress.
Counting and completing
Who can do this: Take in the Stock / Inventory group.
On the counting screen, enter the counted quantity for each item and save the count. On a spot check you can Add Item to bring another item into the count. When you are done, choose Complete Stock Take and confirm. Completing sets the status to completed and, for any item where the counted figure differs from the system figure, creates an adjustment movement automatically so your levels match reality. This cannot be undone.
To abandon a count, choose Cancel Take and confirm - the status becomes cancelled and the counts are discarded. Both options are only available while the take is in progress.
Troubleshooting
Why can’t I approve or dispatch a request? Approving a pending request needs the Approve permission, and dispatching an approved one needs the Move permission (in the Stock / Inventory group). The button may show for any viewer, but the server checks the permission when you press it.
Why is an item showing low stock? AutoM8 flags an item when its total falls below one-and-a-half times its Min Stock Level (amber), and again when it drops below the minimum itself (red). Set an item’s minimum, and seed its opening quantity, so it does not flag before it needs to.
Why did a stocktake create movements? Completing a count posts an adjustment movement for every item whose counted figure differs from the system figure, so your levels match what you actually hold. This cannot be undone.
Why can’t I see or act on the stock screens? If the stock menu or its buttons are missing, the cause is nearly always permissions, visibility scope or plan tier. The general troubleshooting page walks through them.
Related
- Purchase orders and suppliers.
- Creating and managing jobs.
- Stock control comes as standard with AutoM8’s field service software.